System on a Chip (SoC) processors have recently been growing in popularity lately, that they are slowly replacing the big and bulky computers which gobbles up a lot of watts of electricity with the same functionality.
It all started with the SheevaPlug, which is a basically a PC built-in into a box as big as a plain-old AC Adapter.
 |
| Tonido Plug |
 |
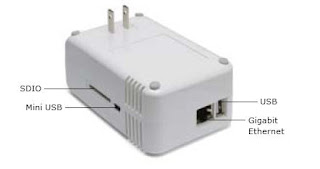
| Pogoplug |
 |
| Seagate Goflex Net |
 |
| Dockstar |
These devices are basically computers capable of running Linux distributions (and even some Windows Applications using Virtual Machines) and have USB ports that can be used to expand their capabilities in addition to their already existing roles.
There are lots of different ways these devices are being used (aside from their original functions) and lots of possibilities abound as to how these devices can replace your 500-watt power guzzling Desktop PC.
The most popular of these SoC computers is the Raspberry Pi. It has a built-in HDMI, RJ45 network and 2 USB ports (for the more common $35 B model). Running on a Broadcom BCM2835 chip, it is a amalgamation of CPU, GPU and DSP which allows you to use only one chip on a board.
 |
| Raspberry Pi |
How to setup your device to record and stream webcam images
Everything discussed here is from Arch Linux, but is also valid for other Linux Distributions. Just substitute the commands with the equivalent for your implementation (example pacman for Arch Linux = apt-get for Debian)Install Arch Linux (or any other Linux variant like Debian) on an SD Card (http://www.raspberrypi.org/downloads).
Next, setup your Raspberry Pi with power (I used a Blackberry Playbook Power adapter), a USB storage device.
Note: if using a hard drive, there might not be enough power to run the HDD, use a powered USB hub to supplement the power and of course, a webcam.
Plug the Raspberry to the network and connect it to a monitor using the HDMI port.
Insert the SD card with the Linux distribution image and supply the power to the Raspberry Pi.
The Raspberry should now light and boot up on screen.
Default user/password is root/root.
Login and check if your devices are showing up using lsusb
Format your USB drive using Fdisk and Mk2efs utility. (i.e.: fdisk /dev/sda)

Mount it (mount /dev/sda1 /media)
If /media does not exists, you can create the directory first (mkdir /media)
Install the utilities you need like samba (for windows file system network access), lighttpd (for web services, ffmpeg (for video compression), etc.The tool you would really need to stream video to the web is MJPEG-Streamer. This app takes video input from /dev/
Install Mjpeg Streamer (our webcam streamer software)
pacman -Sy mjpeg-streamer
Mjpeg-streamer has two types of output, web stream and file. You can output both at the same time by using two -o parameters in the mjpg_streamer execution.Outputting to an image file is recursive and you can generate multiple frames per period. In this example, we are generating output to web and an image file every second:
/usr/bin/mjpg_streamer -i "input_uvc.so -d /dev/video0 -f 10 -r 960x720"\
-o "output_http.so -p 80 -w /media/share/www"\
-o "output_file.so -f /media/share/cam1 -d 1000"\
-b
In this instance, the web stream outputs 10 frames per second at 960x720 pixel resolution to the http port (80) and a file output is being stored in /media/share/cam1 directory at a rate of 1 pic per second.Be sure to create the cam1 directory before running this though...
In order for the mjpeg-streamer utility to run automatically, you should place it in rc.local
nano /etc/rc.local

ps -aux | grep mjpg_streamer

Now, when running the app for 24 hours, the number of image files that will be generated is 24 hours x 60 minutes x 60 seconds = 86,400. Multiply this to the number of days you are going to run this security cam, you can generate a million images in just 12 days... And since we will be storing the files in a network share using SAMBA, listing the directory will probably take you a few minutes. In order to generate a more manageable number of files per directory it is more prudent to split these files in different directory either per hour or per couple of hours.
In order to implement this, we will need to make a script (housekeeping.sh) that will be running every n hours (in this case, every 2 hours).
Here's a sample of the script I made:
pkill mjpg_streamer
mv /media/share/cam1 /media/share/cam1-`date +%Y.%m.%d.%H%M`
mkdir /media/share/cam1
/usr/bin/mjpg_streamer -i "input_uvc.so -d /dev/video0 -f 10 -r 960x720"\
-o "output_http.so -p 80 -w /media/share/www"\
-o "output_file.so -f /media/share/cam1 -d 1000"\
-b
This script kills mjpg_streamer process, renames the cam1 directory to a new directory (using the date-hour-minute as filename) and runs mjpg_streamer again.Save it and enable executable flag:
chmod +x housekeeping.sh
Then we should now tell the system to run this program every two hours by going to the cron editor.
crontab -e
Insert this line in the cron table
0 */2 * * * /media/housekeeping.sh
This line instructs the system to run /media/housekeeping.sh every two hours everyday. The purpose of the this, is to create a new directory every 2 hours containing two hours worth of images.
And you're done!
Sample output by going to your Raspberry Pi's IP address (example http://192.168.1.1)

The next step would be, is to open up your router to redirect your internet IP address to your Raspberry Pi (if you want to be able to monitor the webstream from outside your network).
Next: I'm going to discuss automating ffmpeg to convert those JPG files into one AVI file...
1 comment:
Hi,
I stumble across your page while searching for a way to get a webcam server on a pogoplug. I'm a complete newbie to arch linux, so it's slow going. Thanks for putting up so much detailed information. I really appreciate you sharing this.
Hope to see more of your pogoplug projects.
Post a Comment